terça-feira, 7 de dezembro de 2010

What can I say?!


Almost no work on the boat for the last three weeks!When it's dry it's way too cold. When it's not cold it's way too wet!
Still managed to put in a couple of hours of progress on it, like the roof stringer and some floor taping.It will take a good two days of dry weather just to dry up the shop enough to do some serious work.
I'm wondering if wouldn't be best to take on the metal parts and wait until next Spring to resume epoxy work.

Let's see!

quarta-feira, 10 de novembro de 2010

Taping and waiting

To align the two halves to join I used a set of small plywood squares with a 5x50 mm M5 screw across about every 1/2 meter and where it called for extra clamping pressure.
Then , after aplplying putty, I used 80mm wide tape in between the plywood pads to lock in the joint. The tape beds were previously rebated to avoid glass build up on those areas.
It seems to have worked very good.
Now the join line is ready for sanding and final taping acording to plans.
Temperatures are falling which is delaying curing.
I'm trying to get to the fairing stage which takes a long time and can be done in adverse conditions. Just hoping for a couple of days with decent weather to complete the exterior lamination.
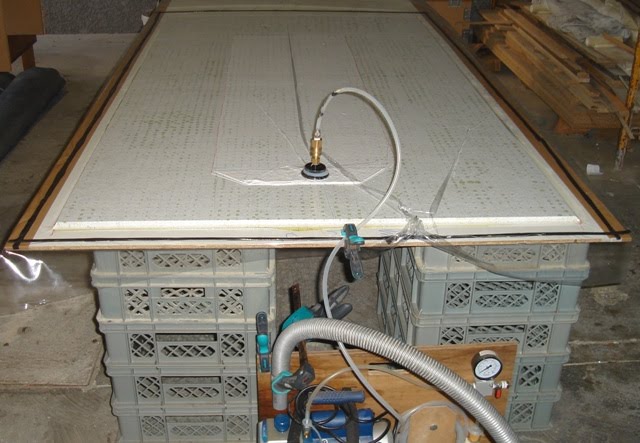
Here the clamping pads acn be seen in more detail. It's very easy a quick to install even single handed. The use of a tubular m5 socket (?) on the power drill makes tightening the nuts much faster. In some spots it may be necessary to drill 6mm holes through the joining line if there's not enough clearance.


domingo, 7 de novembro de 2010

Getting ready to join the two halves which is the first significant millestone of the project.
I never tought I could move around so easily the port half and I was planing to get help from a couple of friends. By now I feel pretty confortable moving the stuff around. In the photo the daggerboard case can be seen already in place.
Next step is actually joining the two halves.

As a tip to level up the case on both ends I used a plywood strip ( with plastic tape!) . This way it's very easy to do the necessary adjustments at the same time as it acts as a back mold plate to stop putty from spilling out inside. Not all ideas work as planed but this one turned out to be just perfect! Simple and very efficient.
Now have a lot of taping to do along the comimg days. I hope the project keeps going as well as it's been happening until now.

quarta-feira, 3 de novembro de 2010

Trying to climb and stay up on the steep section of the hull can be a tricky business. Good solutions are straight forward. This one works very well. Several plywood boards are kind of stitched together with plastic straps and the whole set is suspended on the bow edge.
Today I wasted way too much time trying to lock in position the bow web. At first tried to use wedges but they couldn't hold position. Then I decided to drill fore holes and sandwich the web in between. By using a set of 4 nuts on each screw it was very easy and reliable to level the web. It worked just perfect.
On the underside I used a 5mm drill bit as a spacer to garanty center alignment since I lined up the bottom face of the template with the centerline of the hull.
The corrugated tube is .... well... a head bump saver!


segunda-feira, 1 de novembro de 2010

Productive weekend

The weekend has been quite productive. Since I had borrowed a laser from a local plaster wall company I wasn't sure if I had enough time to do all the alingment needed before having to turn it back. Fortunately Monday is a national holiday and the extra time really come in handy.
All simetrical parts have been aligned.

I put some foam on the main hatch edges since I was getting tired to bang my head ( ouch!) everytime I climbed in and out.
This laser is excellent. It has two cross lines ( vertical and horizontal) and four point markers on the plane perpendicular to the cross lines. I couldn't ask for more. It even comes with a great tripod. Nevertheless I still insisted on the plumb line as a complement to line up the bulkhead center holes.


sábado, 30 de outubro de 2010

This weekend I managed to borrow a laser from a local contractor. Despite the terrible weather outside with strong winds and intense rain, thanks to the polietilene panels I installed on the shop I've been able to keep working without any problems.
Today I ligned up both main hull halves and glued the trasom, aft and forward bunk bulkheads. Tomorrow I plan to complete this stage by placing the forward and main hatch bulkheads as well as the flanges for the forward and cockpit panels and the cabin setee.
This way I'll be done with the laser and can return it to the contractor.


segunda-feira, 25 de outubro de 2010

Setting up materials for vacum bagging. Peel ply, bottom layer glass, foam ( not shown), top layer glass, peel ply, release film, breather fabric , vacuum film and sealing tape. Too bad most of this stuff will go straight to the trash bin! With this process it's possible to get excellent laminates.
This is the largest vacuum laminate I did so far measuring 1.08 x 2,60 m! With this size it's possible to cut out the forward bunk top and aft cabin floor and still get some off cuts large enough for smaller panels.
I'm using the vacuum cleaner tube on the venting outlet of the vacuum pump to avoid getting oil mist flying around the shop which could compromise resin bonding if it where to set on surfaces subject to future laminations. Had I known this I would have chosen an oiless vacuum pump. This is particularly severe if you don't get a full vacuum and too much air flows through the pump.


Starboard hull half sanded and ready for next stage. I was able to get a laminate nearly free of any imperfections without using any plastic film as many other builders use. It takes some practice to get the hang of it but after a while it actually becomes a lot easier than one could expect.


I planed to have some friends over to help me place the port hull half in position, but couldn't wait for the weekend so decided to do it myself with the help of some straps hung up on the ceiling. I didn't count how many times I went up and down the ladder but it must have been close to a hundred times!


After a few hours the hull is finaly in place. I'm very pleased with the alignment of the two hulls.


It's beggining to look like a boat, but still a long way to go.


Bow trimmed and ready to install the bow web.


quinta-feira, 14 de outubro de 2010

Update

Beams, folding system and beam mounts have arrived from New Zealand. Took a quick look at the stuff and stocked it away for later. Still have a lot of work to do before the project is ready for the setting up the beams. Not much I hope!
In the meantime caught a small snake ( Montpelier rat snake) in my backyard and decided to make it my project "partner". The little thing is quite picky as far as eating goes. After trying all kinds of normal food (live and dead) I only convinced the snake to eat lizards. So I set up a food chain scheme with glue to catch flyes first, then lizards and it seems to have worked fine.

Anchor well on the way. It's finished and set aside for instalation.


Getting ready for the daggerboard. I built a custom table to make working around the blank as easy as possible.


Building up the thickness ( 50mm!).


Blank ready for HD inserts


Some drawing board work.

Routing...routing and more routing!

Daggerboard routed with the core insert. Looking good!


I decided to apply a first layer of carbon UD to avoid any possible warping due to uneven exotherm on the two sides during lamination.
The Daggerboard has been by far the most complex single component that I've made so far. It requires a huge amount of concentration during the whole process, especialy when tracing and routing the isometrics. In fact I ended up inverting the foil on the second side which forced me to reinsert a plug and repeat the routing process. The putty used on the one side induced a warp in the board. Fortunately I managed to apply counter warp and "froze" the shape with some carbon UD. It's not the best daggerboard in the world but it will do just fine. After all I spent nearly two weeks around this part and wasn't in the mood to let the whole work go down the drain.
I don't recommend this process to anyone coming behind. Take a look at other solutions or have it CNC'd. It will save you a lot of trouble, believe me!
Anyway, if you really want to claim for yourself the statute of boat builder, you've got to negociate with one of these foils!

Rudder, Daggerboard and Case waiting for lamination.


Winter is setting in, so I decided to close up the side of the working space. This way I hope it gets warm and dry enough to keep me going through the winter. I expect to glue both may hull halves and laminate the outside skin in three to four weeks time, so most of the remaining work can be done under controled environment.

Job done! It looks pretty good and I can already feel the improved confort.


Here the second main hull half is progressing at good speed. Tomorrow I intend to finish the remaining interior bulkheads and panels to get the hull ready for joining.
Weather has been fantastic so far . Let's hope it holds for another week or so!

terça-feira, 31 de agosto de 2010

Rudder part 2

... placed the HD inserts ( actually should have put them before tracing to avoid having to retrace the lines over the inserts)


Then started rounting form the edges in to keep the next lines always visible.


.... some preliminary sanding and the foil starts to show up.

On the other side I used 2mm steps. It's quicker and produces the same effect.
On both sides I left the contour isometrics for hand shaping since it's a lot easier and less confusing.


Finaly I cut the foil off and did some sanding.
Tomorrow I expect to finish final shaping and leave it ready for lamination.
I missed the little insert for the rope. I'll add it in later on using an HD putty fill or a piece of G10 tube with plastic bushings.
This process although time consuming is pretty straight forward and reasonably precise.
The HD core can now be cut and wraped with glass according to plans.


Rudder Part 1

Before starting on the rudder I finished the second cabin setee.
Then I made a 30 mm foam blank the same size as the full size pattern sheet ( 139.5x37.5). This way its easier to get a perfect match on both sides. It also makes a good and stable base for the router.


Then, picking up from Menno and Grant's idea, I traced the isometrics on the blank.

Then using a foam strip I traced the lines for the router, in this case with a 1mm steps.


The routing guidelines look pretty good.


quarta-feira, 18 de agosto de 2010

Update

Back in business!
Finaly got some slack off the work I had on hands since March.
In about a week's time I managed to make the bobstay eye... ...the bow web (here ready to cut the slots using a diamond disc on the grinder)...
... the daggerboard case...


... a practical system to prepare small batches without the mess...


... and about 2/3 of the second main hull half ( here ready for lamination).


Since I'm running out of resin and my local supplier is closed for vaccation in August, I'll use whatever stuff I have left to do smaller jobs.
I guess I'll be moving on to the rudder mount, main cabin hatch and anchor well ,while I wait for more resin, glass and other supplies. I still have three full size foam sheets which may be good to make a few panels for the second main hull half.
So far the working pace has been very good. Let's see how things progress along the coming days.
By the end of September I'm afraid I'll have some work to deal with, but I hope I'll be able to squeeze some boat building action in between.
This boat has to hit the water next summer no matter what!


quarta-feira, 21 de julho de 2010

With the help of some friends, first main hull half is out and up on a rig suspended from the garage ceiling.
Mold has been inverted and ready for planking.

Work has been suspended since May due to some other projects that came up in the meantime.
Now I'm free to continue the boat project.
Will be doing doing some sailing on the Minitransat early next month.

Beams have arrived and are waiting in Lisbon to be transported by truck up north.